This is an update to an older blog where I listed the most basic supplies you need to start art journaling, but the underlying message is to NOT go crazy collecting “all the things”, and to focus instead on creating. There will be plenty of time for allowing your art supply collection to slowly take over your living space, but it can easily become a problem if you collect more than you need instead of taking the time to use what you already have.
That point is still the same in this blog, BUT I’m going to be more specific because I realize that a list of recommended journals and pens just won’t cut it.
If you only want a quick, simple, and easy shopping list to print and bring to your local arts & craft supply shop, scroll down to the bottom of this page for a PDF!!!
If you want actual product recommendations, keep reading on your way down 😉
The following list might look intimidating, but that’s only because I’ll be elaborating in greater detail for everything on the list. Assuming that the fundamental of an art journal page will include a colorful, layered background plus a focal image plus a sentiment (word, phrase, or journaling)… you only need the ingredients to make that happen.
- Paper
- Pen
- Color
- Scissors
- Glue
- Decorative
It’s how you choose to create that dictates which supplies you’ll need to start. Art should be therapy, not stressful, so stick with the products that fit comfortably in your budget. (That doesn’t mean to always buy the cheaper supplies because sometimes that can be more expensive in the long run.)
For each section, I will include brand/product specific recommendations and a cheaper option for a budget-friendly (but usually short-term) alternative.
I’ll also admit that the following list may use affiliate links only when a specific brand or product is mentioned. If you do use that link to order something that you’re going to buy anyways, it will help support my local art supply shop 😉 (And also drama club / cub scouts for my little humans.)
Now without any further babbling, here’s an updated list on what you’ll most likely need to begin your journey:
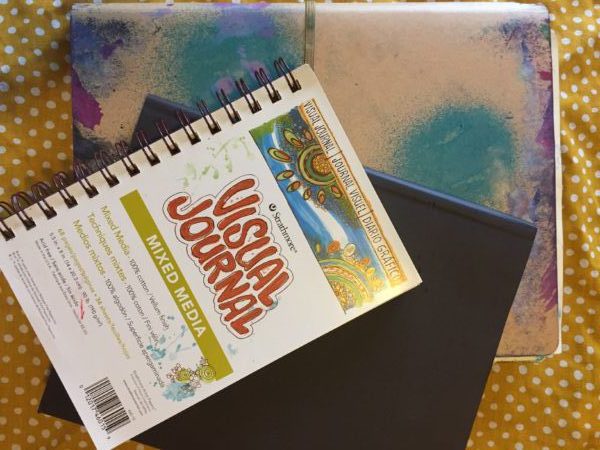
Obviously, you need a journal.
Over time on your journey, you will have a favorite journal. Until then, you’re probably going to try a few different approaches.
On the cheaper side (or free), you can take any book or notebook and use it for art journaling but you *will* need to invest in gesso to prime and prep your pages for paint and other mediums.
You’re going to want gesso in your mixed media art supply kit anyways, but it’s less of a necessity with paper that’s already designed for the medium(s) you’ll be using.
If you have some money to invest, I’m going to recap the list of what I’d recommend for a beginner.
- Strathmore is a great brand for high quality mixed media paper, and their journals don’t disappoint. My favorite is the Mixed Media Art Journal but the Strathmore Visual Journal is just as good for half the price 😉
- The Moleskin is very popular for hand lettering, doodling & bullet journaling. However, I did purchase the “wrong kind” and found the pages to be very thin and transparent. I’m linking to the watercolor moleskin, but do not have the right experience to personally attest to the quality of this one.
- The Dylusions Creative Journal (by Dyan Reaveley, Ranger Ink) is, hands down, my absolute favorite ready-made book for art journaling. The pages are almost like a manilla folder, and designed specifically to work well with Dylusions sprays (which do not work so well on other types of paper.)
I saved the Dylusions journal for last because in my personal opinion it’s the best for ALL skill & experience levels. So if you’re new to art journaling and looking for the right journal to start with, this is it. The other ones are good too, but THIS is the one you want. Go ahead and put it in your shopping cart… I’ll wait here 🙂
Now in the previous blog I went from journals to pens and skipped one of the most important things. Silly me!
Obviously you’re not going to be able to create beautiful, colorful art journal pages without…
Color!!!
There are LOTS of ways to create colorful backgrounds, and you’re going to need some options that fit your budget.
So on the cheap end, you can start by grabbing some craft paint, acrylic paint, watercolor paint, etc. This is only going to be a temporary solution, but pick a few colors you like to work with plus black and white.
If you have a little more to invest, here are some specifics that I recommend. Only because there will be several brands mentioned, this list is probably going to be the longest!
Let’s start with the Ranger brand. If you watch a lot of Youtube, you’ve probably seen a LOT of these products because they are a go-to brand for mixed media art projects, including art journaling.
There are multiple designers in the Ranger line, so choose the brand that fits your “style”.
Dyan Reaveley- Dylusions
If you like bright, funky, & vibrant colors… you are more likely to be drawn to the Dylusions brand by Dyan Reaveley or you might also enjoy Dina Wakley Media.
- Dylusions paints. They come in a variety of vibrant (and now pastel!) colors, which dry very quickly. The key is knowing that a little will go a long way. Also, the opacity is perfect for layering which results in a beautiful mixed media background.
- Dylusions sprays are available in the same shades as the Dylusions paints, so they are ideal for using together to create beautifully blended & layered backgrounds. More importantly, they respond to water in a magical way which allows you to create a variety of effects such as “ghosting”. While they can be messy to play with at first, once you learn how to use them properly (here’s a video with some important tips on creating a blended background using the grid technique and here is a printable cheat sheet to help sort colors) then you’ll probably fall in love too! When using Dylusions sprays you will also want to protect your workspace with:
- A Ranger craft sheet.
- Or, on the cheaper alternative end, a teflon baking sheet like this one.
- Dina Wakley paints are heavy bodied acrylics in vibrant, bright colors. I would honestly recommend these if you intend to create more mixed media canvases, but the colors are so lovely that they can easily be incorporated into your art journal as well.
Tim Holtz- Distress
If your style is more vintage, earthy, or steampunk-y, you are more likely to be drawn to the Distress brand by Tim Holtz.
Note that the popular alcohol inks by Tim Holtz are ideal for non-porous surfaces so not recommended for art journaling. What can be used, and is great for tags to insert in your journals, are:
- Distress Inks have many versatile uses, and they respond to water similar to a watercolor in the way they blend together.
- The new Distress Oxide Inks have a different formula and are pigmented, so they respond differently to water and will dry to an oxidized finish.
A good mixed media kit will contain a variety of paint/color options. Even if you have money to invest on brand name supplies, there are still many good “cheap” craft & acrylic paint options in the dollar store, Walmart, and Michaels that you’ll want in your kit.
You’re also going to want markers, colored pencils, gel pens, etc.
So let’s move on now to some other specific brands & products:
- Faber Castell Gelatos kind of look like chapstick, but they work kind of like a creamy watercolor crayon, and the color will “move” and blend wet OR dry. It’s important to prime & prep your page with gesso first before using gelatos. These have been very popular with card makers for coloring stamps.
- Neocolor II Watersoluable Crayons are another personal favorite of mine, but also on the pricey side. That means that they aren’t necessarily a “must have” for beginning your art journaling journey, but something to make note of for a bucket shopping list if you find you enjoy working with watercolors.
- Derwent Inktense Blocks, again, are a “premium” supply that will be a bucket-shopping-list item similar to a watercolor, but they are more of an ink. Once they are dry, they are “set” and will not respond to water. This makes them ideal for layering projects, because you won’t worry about messing anything up… and they are so vibrant! If you’ve already experienced the Derwent Inktense pencils then you should know the blocks are exactly the same thing inside the pencils. Since they are blocks, you get MORE of that magic which you can use to draw on a page and blend out, use a waterbrush directly on the block to paint, or grate and mix with water for a vibrant wash. I was lucky enough to grab the set of 72 on sale for $30 (currently $90) and they WILL last me a lifetime… so, if nothing else, I would suggest adding these to an Amazon wish list. This way you can receive a notification if if they ever go on sale like that again– because if they do: you won’t want to miss it!!!
I see this has shifted away from needs and towards wants so let’s move (back) on to more of the necessities before I start mentioning Colorbursts and…
yeah.
Supplies for Layering
- Stencils. I have favorites, but there’s no need to recommend anything specific here. Choose stencils you like!
- Stamps. Ditto to the previous description, though I will suggest making sure your kit includes at least one of each of the following:
- A “focal image” stamp. This could be a person, or an object, but something you can see yourself using as a focal image.
- A set of alphabet stamps. One bit of advice I have for beginners would be that if you’re including a sentiment, you want those words on a seperate sheet of paper and then work out placement before adding to your page. Using an alphabet stamp is one of many ways to do this.
- A “pattern” stamp. This could be a simple geometric shape, or a pattern you can use to add layering.
- To go along with the stamps, you’re going to want archival ink that won’t smudge or react to water. I’m recommending the Ranger brand because it’s the most trusted for quality, and I’m also recommending black ink because it’s the one you’ll use most but over time you may find yourself wanting a few more colors for different purposes. (Example, I will be purchasing a brown archival ink today for a woodgrain patterned stamp because it will have a more natural impact than using black.)
- And an acrylic block for cling stamps. For something versatile, try the Dylusions Journaling Block which includes a ruler and a curved edge that’s great for creating borders or journaling lines. For something simpler, any acrylic block for stamping will work.
- You’ll also want a spray bottle for water.
Supplies for Prepping, Gluing, and Texture
- Gesso. Necessary for prepping & priming your page most of the time. This is not needed (or recommended) if you’re using only Dylusions paints and/or sprays, but it is necessary if you’ll be using any kind of watercolor, watercolor crayon, gelatos, etc.
- Adhesive. Omg, not just one kind either! I have an entire shelf in my creative space dedicated to a buffet of glues and adhesives for a variety of purposes!!!
- Gluesticks. I recommend Uhu and the Tombow Mono Liquid Glue
- Strong Adhesive. This is more for mixed media projects where you need to permanently attach something. For example, sticking a plastic flower on the cover of a book or journal. I tried this with a hot glue gun once. Speaking from experience, don’t do that. Use E6000. There, I just saved you some trouble… you’re welcome! 🙂
- Gel Medium. Use this as both a glue AND a sealer on your art journal page. Once dry, you can continue to add more layers of color too. To prevent your pages from sticking together, run a heat gun on the side of a votive candle until it softens and then rub the candle over your page.
- A double sided tape runner. If your mixed media art journey includes paper crafting, this will make your life easy. But get a good one, like the 3L Scrapbook Adhesives tape runner.
- You might also benefit from running your cutouts & printables through a Xyron sticker maker 😉 Again, this is more of a want than a need because you can just as easily cut & glue rather than cut & turn into a sticker… but it’s certainly made my projects easier!
- PVA glue, if you end up creating your own art journals down the road. This is the best glue for bookbinding.
- Glossy Accents or Diamond Glaze. Both achieve the same impact– don’t use these as glue but to cover something important. Once dry (you have to be patient) it becomes a dimensional, glossy, clear, hard “plastic”. These are used a LOT in jewelry making. They come in very small bottles so I will suggest only using this to emphasize something specific.
- Mod Podge is a cheap alternative to gel medium, available in glossy or matte.
- Even cheaper is mixing 2 parts cheap white glue with 1 part water and storing in an airtight container.
- Honestly there are more but I think this list is long enough! Just… get a few different kinds of adhesive and move on! lol
- Texture will easily become another loooong list. There are a TON of texture paste options you can buy specifically and they are all great for adding dimension and/or creating a specific effect. (PS- Glossy Accents belongs in this list too, huh?) But rather than going through the extensive list of products available for specific textures and results, here are some cheaper alternatives you can use for basic texture that you may already have in stock or can find at the dollar store.
- Dry wall tape
- Spackle
- Caulk
- Sand
- Tissue Paper
- Napkins & Paper Towels
- Netting from produce
- Feathers
- (this is not the end of the list, but I’ll let your own creative imagination continue!)
Must-Have Tools
- Scissors
- A craft mat to protect your surface
- Pens.
- Paintbrushes. (Also sponges, spouncers, blending tools & replacement sponges, makeup sponges, and other varying alternatives.)
Tools You Don’t Need But Might Want
At some point in your journey, you might be tempted to grow your mixed media art kit with a variety of tools that could make your creative time easier. Perhaps you saw someone in a Youtube video using X and suddenly you’re obsessing over getting an X for yourself!
For example, you might prefer using a paper slicer over cutting everything with standard scissors, or you might want a pair of small precision scissors for fussy cutting. You might want to invest in a typewriter from a thrift shop to add some authenticity to your sentiments.
Certain things are easy enough to grab at a store and I won’t need to list them. (Like a brayer, for example.)
I’m also POSITIVE that at one point or another you’ll consider splurging on something bigger than that, like a Cricut or a Sizzix machine for die cutting.
If you will use those things often, they are worth every penny! But you don’t need them to get started because these are all things that will come up as part of your journey and that is perfectly okay.
Please don’t feel the urge to grow your mixed media supply kit too quickly! Give yourself time to truly appreciate and use what you have… otherwise you may end up with a pile of stuff that you only tried once or twice and ultimately have no real need or use for.
Besides, if you’re going to splurge impulsively, consider adding to your collection of paints, tools, and…
“Decoratives”
These are mostly optional, but also fairly inexpensive and easier on the wallet to collect. Things like:
- Washi tape
- Stickers
- Ephemera
- Glitter
- Embossing powder
- Liquid Pearls or Stickles or other dimensional paints for accents.
- Stamps & Stencils. (These count as decorative too!
(Again, not the end of the list but an encouragement to use your own creative imagination!)
Phew! I can see what took me so long to get around to writing this blog! I do hope that it helps you find and choose the supplies to get started which are right for you.
Now here is an Art Journaling Supplies Shopping List that you can print and bring to your local arts & crafts supply shop 🙂